Why this matters
Without proper mapping, students end up with credits that can't be booked. That creates three problems for your school:
- Confusion at booking time, which generates support questions for your front desk.
- Underused credits, because students give up trying to redeem them.
- Mismatched durations — a cancelled 30-min lesson should not turn into a credit for a 60-min lesson, and vice versa. Mapping keeps the swap fair for both you and the student.
The good news: it's a one-time setup per service, and once it's in place, Opus1 handles the rest automatically.
What good looks like: When a 30-minute piano lesson is cancelled, the issued credit is redeemable only for a 30-minute piano makeup slot — not a 45- or 60-minute one, and not a totally different instrument.
Before you start
A short checklist before you click into the settings:
- Your makeup services are already created. You'll need a separate makeup service for each duration you offer (e.g. 30-min Piano Makeup, 45-min Piano Makeup, 60-min Piano Makeup). If you don't have these yet, create them first.
- You know which durations you offer. The mapping should match duration for duration: 30-min regular maps to 30-min makeup, 45-min regular maps to 45-min makeup, and so on.
- You've decided your late-cancellation policy. Late cancellations can either forfeit the visit (no credit) or issue a credit. This guide covers both.
Table of Contents
- Understanding cancellation credits
- Where to find the settings
- Client visit cancellations
- Client late visit cancellations
- Staff visit cancellations
- Final steps
Understanding cancellation credits: timing, validity, and limits
For a full breakdown of how these settings work — timing rules, credit validity, and caps — see Understanding Cancellation Credit Settings.
Where to find the settings
Makeup credit mapping lives on the Cancellation tab of a service's edit page. Here's how to get there:
1. Open the Services page
Click services in the left hand navigation menu and you'll see all of your services listed
2. Click Update on the service you want to configure
Find the regular service you want to set up (for example, Piano Private Lessons - 30 min) and click the update button on the right:

This opens the service's edit page, which has several tabs across the top.
3. Open the Cancellation Tab
Click the cancellation tab. This is where all of the mapping happens. You'll see a Cancellation Policy section at the top, followed by three separate sections - one for each kind of cancellation.

↓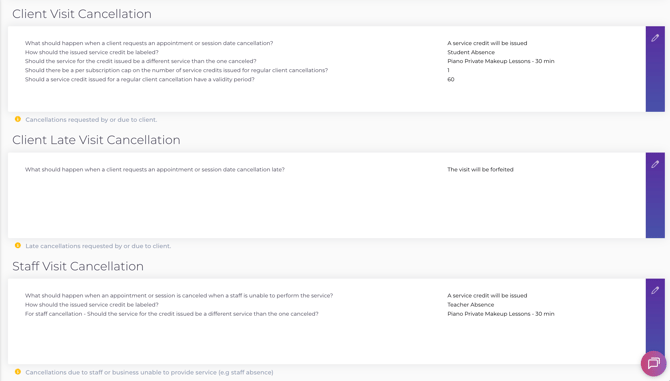
The three sections you'll configure are:
- Client Visit Cancellation - when a student cancels on time (or before the late cancellation cut-off)
- Client Late Visit Cancellation - when a student cancels after the cut-off (e.g. less than 24 hours before the lesson)
- Staff Visit Cancellation - when you or a teacher has to cancel (e.g. teacher absence)
Each one will have its own makeup credit mapping. They work the same way, so once you've done the first, the others will feel familiair.
Section 1: Client Visit Cancellation
This is the most common case: a student cancels their lesson before the late cancellation cut-off. You'll typically issue a credit so they can rebook.
- Click the edit pencil on the right side of the Client Visit Cancellation section
- In the first dropdown, choose Automatically issue a service credit
- Give the credit a label that students will see (e.g. Student Absence)
- Find the field labeled "Should the service for the credit issued be for a different service" and toggle it ON
- In the dropdown that appears, select the matching makeup service - for a 30 minute regular lesson, choose the 30 minute makeup service
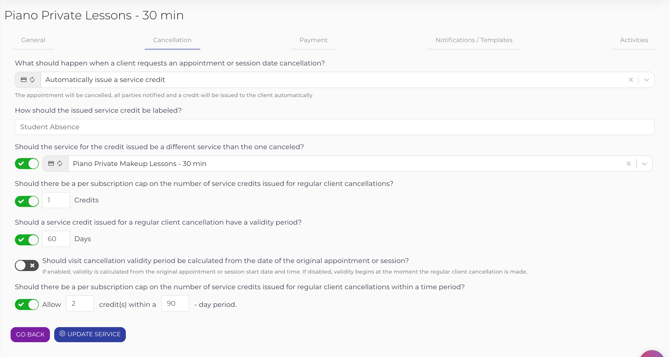
When you open the dropdown, you'll see every service in your school, including the original (non-makeup) version of the service you're editing. Read the next callout carefully - this is where most setup mistakes happen.
Common mistakes to avoid:
The dropdown lists every service in your school, including the regular service itself. It is easy to accidentally pick "Piano Private Lessons - 30 min" instead of "Piano Private Makeup Lessons - 30 min."
Always double-check that the service you select has "Makeup" in the name. Mapping a credit back to the regular service defeats the entire purpose — students would just be issued credits that book back into your normal paid lesson slots, not your dedicated makeup slots.
And: keep durations matched. A 30-min cancellation should map to a 30-min makeup, a 45-min to a 45-min, and so on.
When you're happy with the settings, click update service at the bottom of the page to save.
Section 2 : Client Late Visit Cancellation
Late cancellations are when a student cancels after the cutoff — usually within 24 hours of the lesson. You have two choices here:
-
Forfeit the visit — the student loses the lesson, no credit is issued. Stricter, simpler.
-
Issue a credit anyway — the student still gets a makeup credit. More forgiving.
If you choose to forfeit, there's nothing more to set up — no mapping is needed. If you choose to issue a credit, the same makeup mapping field appears, just like in Client Visit Cancellation.
- Click the edit pencil on the Client Late Visit Cancellation setting
- Open the dropdown and choose Automatically issue a service credit
- If you choose a service credit, the rest of the form appears, including the same mapping toggle: "For late client cancellation, should the service for the credit issued be a different service than the one cancelled?" Toggle it ON and pick the matching makeup service
- Click the update service button at the bottom of the page to save
Section 3: Staff Visit Cancellation
When the school cancels a lesson — for example, a teacher is sick — you almost always want to issue a credit so the student doesn't lose out.
- Click the edit pencil on the Staff Visit Cancellation section
- In the first dropdown, choose Automatically issue a service credit
- Give the credit a label (e.g. "Teacher Absence").
- Find the toggle labeled "For staff cancellation - Should the service for the credit issued be a different service than the one canceled?" Toggle ON and select the matching makeup service.
- Click the update service button at the bottom of the page to save
Verify your mapping
Once you've saved the changes, you can quickly confirm everything looks right without re-entering edit mode:
- Stay on the Cancellation tab.
- In each section, find the row labeled "Should the service for the credit issued be a different service than the one canceled?" (or, in Staff Visit, "For staff cancellation - Should the service…").
- Confirm the value shows the makeup service name (e.g. "Piano Private Makeup Lessons - 30 min"), not the regular one.
If the value shows the regular service name, click the edit pencil and re-select the makeup version.
Repeat for each service
The mapping is configured per service — so if you offer 30-min, 45-min, and 60-min Piano lessons, you'll repeat this setup three times. The same applies for other instruments. It's a one-time job per service, but it does need to be done individually.
Once every regular service is mapped to its makeup counterpart, your cancellation flow runs cleanly: students get usable credits, your front desk gets fewer support questions, and your makeup slots get put to good use.
Need help?
If a credit doesn't behave the way you expect — for example, a student can't book it into the makeup slot you intended — the mapping is the first place to look. Re-open the relevant cancellation section, confirm the makeup service is selected, and verify the durations match. Reach out to support@opus1.io if anything still seems off.